Configure workflow step settings
Every step in a workflow has its own settings: who is responsible for it, who can see it, whether it can be skipped, and what it waits for. You set these in the Step settings panel of the workflow editor.
Open the step settings
- Select Workflows in the sidebar.
- Select the workflow you want to change.
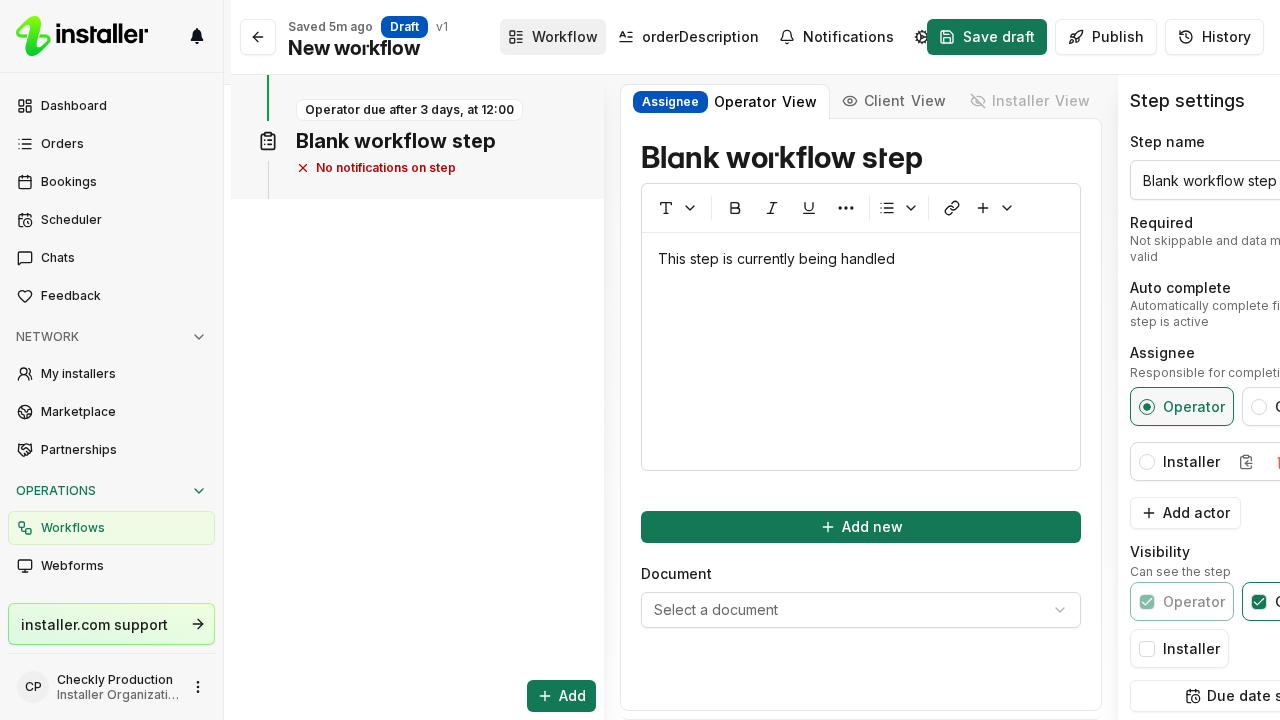
- Select the Workflow tab.
- If a banner reads You are viewing the published version. To make changes, go to the draft., select Start editing or Go to draft. A published workflow is read-only.
- Select a step in the list on the left. Step settings opens in the panel on the right.
- Select Save when you are done. Your changes stay in the draft until you select Publish.
Step settings
| Setting | What it does |
|---|---|
| Required | Not skippable and data must be valid. A required step cannot be skipped, and it cannot be completed until every question shown on it has a valid answer. |
| Auto complete | Automatically complete first time step is active. |
| Assignee | Responsible for completing step. Select one participant. |
| Visibility | Can see the step. Select every participant that may see it. |
| Depends on | The earlier step this step waits for. Only shown when there is an earlier step available. |
| Due date settings | Opens the deadline settings for the step. See Set a deadline on a workflow step. |
| Attach document | Attaches a generated document to the step. |
Required cannot be changed on dispatch steps or their confirmation steps.
Assignee and visibility
Assignee and Visibility both list the participants defined on the workflow. Operator and Client are there by default; select Add actor to add your own, such as an installer company.
The assignee is always included in Visibility and you cannot clear it. Rating steps and dispatch confirmation steps have a fixed assignee.
Descriptions
The middle column shows the step as the people working it see it. It has two tabs:
- Assignee — the description the person responsible for the step reads.
- Viewer — the description everyone else who can see the step reads.
Under Viewer there is one tab per participant that can see the step. Write a description there to replace the general viewer description for that participant. Select the description to open the editor.
Select the step title to rename the step.
Settings for specific step types
Some step types add their own settings to the panel.
| Step type | Extra settings |
|---|---|
| Booking create | Booking type |
| Offer create | Product tags — only products matching any of these tags are shown. Allow own products — lets the assignee add products that are not in your catalogue. |
| Offer confirm | Add-on product tags |
| Dispatching | Auto-dispatch settings. See Add dispatch steps to a workflow. |
| Choice | Group and repeat settings. See Configure Choice workflow steps. |
Delete a step
Select Delete at the bottom of Step settings. The button is disabled when another step depends on this one, and deleting fails if a chat configuration is triggered by the step.
Related articles
- Add steps to a workflow
- Set up a workflow
- Set a deadline on a workflow step
- Configure Choice workflow steps
Need help? Contact Installer.com support.
Was this helpful?